The manufacturing process occurs in following sequence:
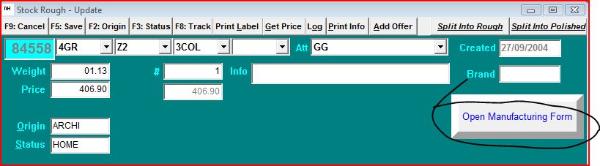
First determine which stock item you wish to set aside for manufacturing. You can do this through Menu -> Stock -> Browse
if the number is known, or alternatively you can select a parcel based on criteria via Menu -> Stock -> Inquiry.
When the Update Form of the selected item is displayed on screen, click on the Open Manufacturing Form button. The
manufacturing form is now displayed with the basic data of the selected stock number.
Next you assign the selected item to manufacturing by clicking on the Assign to Manufacturing button. This will prevent
other users to split, mix or sell this stock item until further notice. If you change your mind you can click on the same button,
which now says Release from Manufacturing.
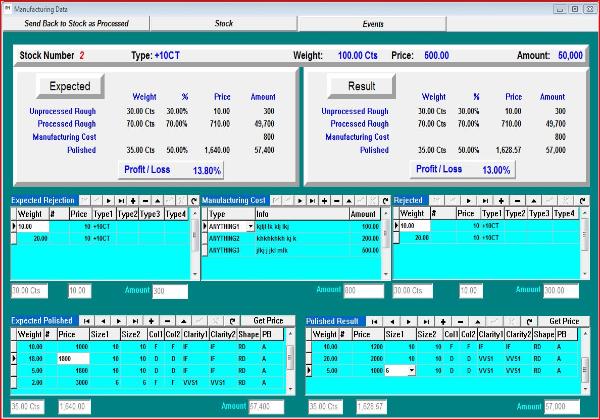
Next you can start filling the left side of the screen. This is a projection tool of what you expect the manufacturing to
produce.
Use the Navigator Bar as shown hereunder to add, post or delete records. Arrow -> down will post the current record and
append a new one.
The middle section of the form can be filled with an estimate of the Cost of Manufacturing.
The upper left panel will recalculate every change in projection in real-time and summarize how the result will look like
based on the assumptions.
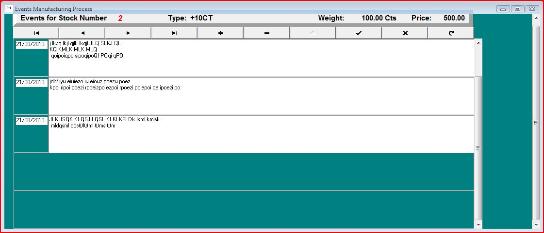
The Event button allows you to describe in your own words the process as it evolves. Comments are ordered in
chronological order.
The right side upper panel is identical to the left side, but instead of a projection it is the actual result of manufacturing,
including rejected or broken rough.
When all goods are back from manufacturing, click on the upper left button that now displays Send Back To Stock as
Processed.
This last step dispatches the polished breakdown as well as the rejected rough back to stock. They will be registered as
descendants from the initial stock item and perpetuate the natural lineage flow of the Stock History.
First determine which stock item you wish to set aside for manufacturing. You can do this through Menu -> Stock -> Browse
if the number is known, or alternatively you can select a parcel based on criteria via Menu -> Stock -> Inquiry.
When the Update Form of the selected item is displayed on screen, click on the Open Manufacturing Form button. The
manufacturing form is now displayed with the basic data of the selected stock number.
Next you assign the selected item to manufacturing by clicking on the Assign to Manufacturing button. This will prevent
other users to split, mix or sell this stock item until further notice. If you change your mind you can click on the same button,
which now says Release from Manufacturing.
Next you can start filling the left side of the screen. This is a projection tool of what you expect the manufacturing to
produce.
Use the Navigator Bar as shown hereunder to add, post or delete records. Arrow -> down will post the current record and
append a new one.
The middle section of the form can be filled with an estimate of the Cost of Manufacturing.
The upper left panel will recalculate every change in projection in real-time and summarize how the result will look like
based on the assumptions.
The Event button allows you to describe in your own words the process as it evolves. Comments are ordered in
chronological order.
The right side upper panel is identical to the left side, but instead of a projection it is the actual result of manufacturing,
including rejected or broken rough.
When all goods are back from manufacturing, click on the upper left button that now displays Send Back To Stock as
Processed.
This last step dispatches the polished breakdown as well as the rejected rough back to stock. They will be registered as
descendants from the initial stock item and perpetuate the natural lineage flow of the Stock History.
Manufacturing - Process
HELP
DH SYSTEMS
| |
| |
| |
| |
| |
| |
| |
| |
| |
| |
| |
| |